Pooling Layer |
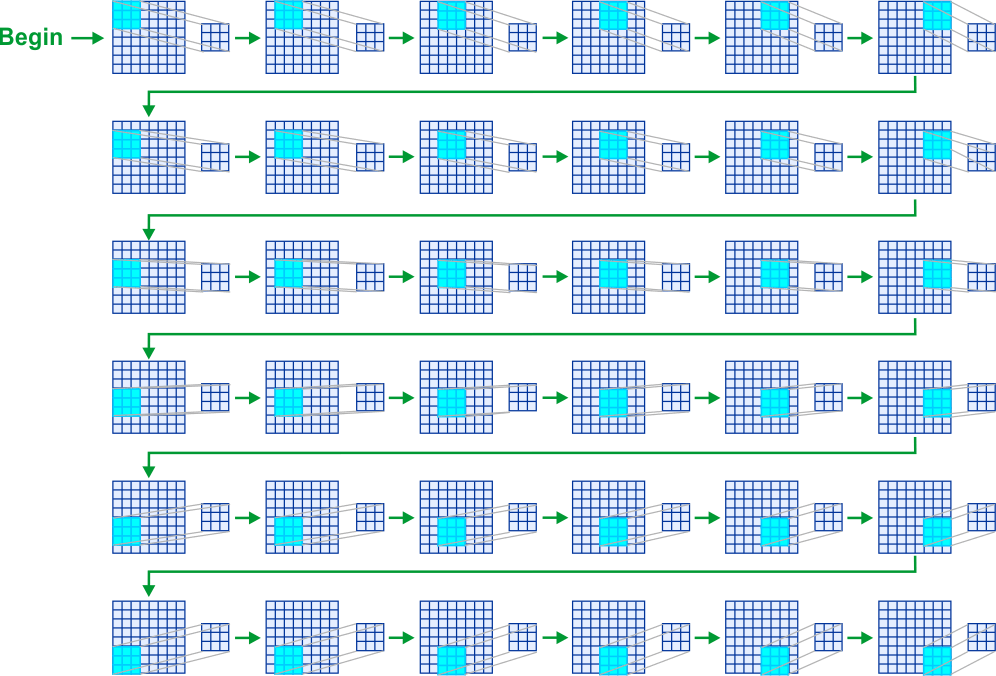
| A pooling layer is used to reduce the width and height of a tensor. Consequently, this type of layer reduces the amount of memory used and training time. Additionally, a pooling layer improves invariance to small translations or shifts. The figure below shows how pooling works. A moving window is placed on the fist cell on the left and at the topmost cell of the tensor, the window is shifted one cell at time to right. When the window reaches the end of the row, the window is returned to the left and is shifted one cell down. The process repeats until the window is on the last row and the last column of the tensor. The window is used to combine the number of the window to produce only one output value. Una capa de poleo es usada para reducir el ancho y el alto del tensor. Consecuentemente, este tipo de capa reduce la cantidad de memoria usada y el tiempo de entrenamiento. Adicionalmente, una capa de poleo mejora la invariancia a pequeños desplazamientos. La figura de abajo muestra como funciona el poleo. Una ventana que se mueve se coloca en la primer celda de la izquierda y en la parte superior del tensor, la ventana se desplaza una celda a la vez hacia la derecha. Cuando la ventana llega al final del renglón, la ventana se regresa hacia la derecha y se desplaza una celda hacia abajo. El proceso se repite hasta que la ventana llega al último renglón y la última columna del tensor. La ventana se usa para combinar los números de la ventana para producir sólo un valor de salida. |
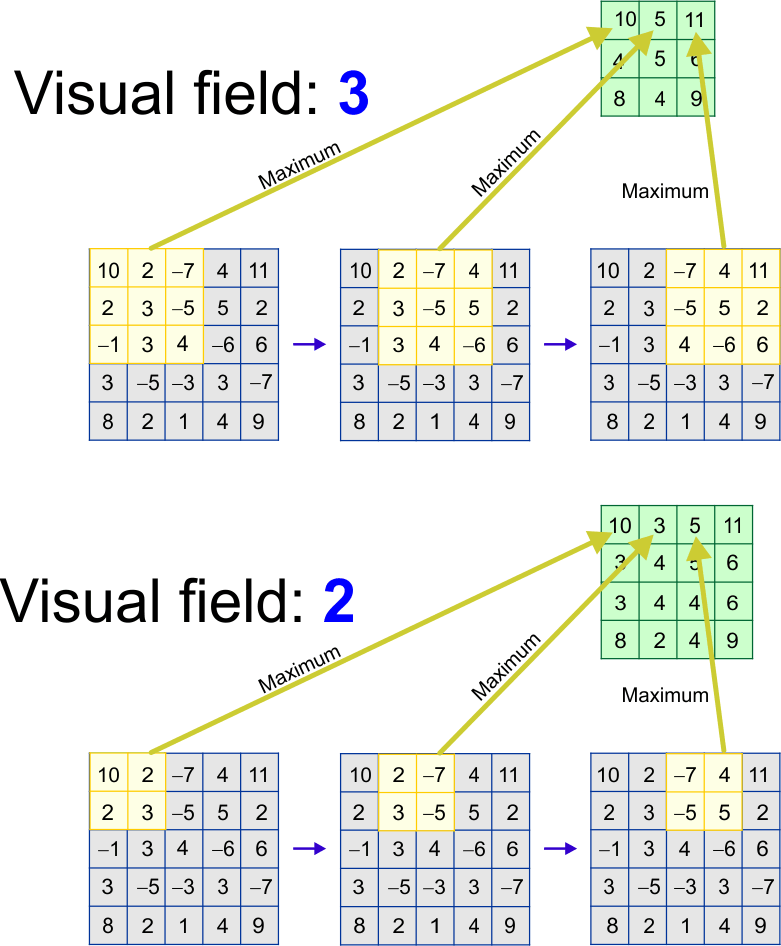
Maximum Pooling Layer |
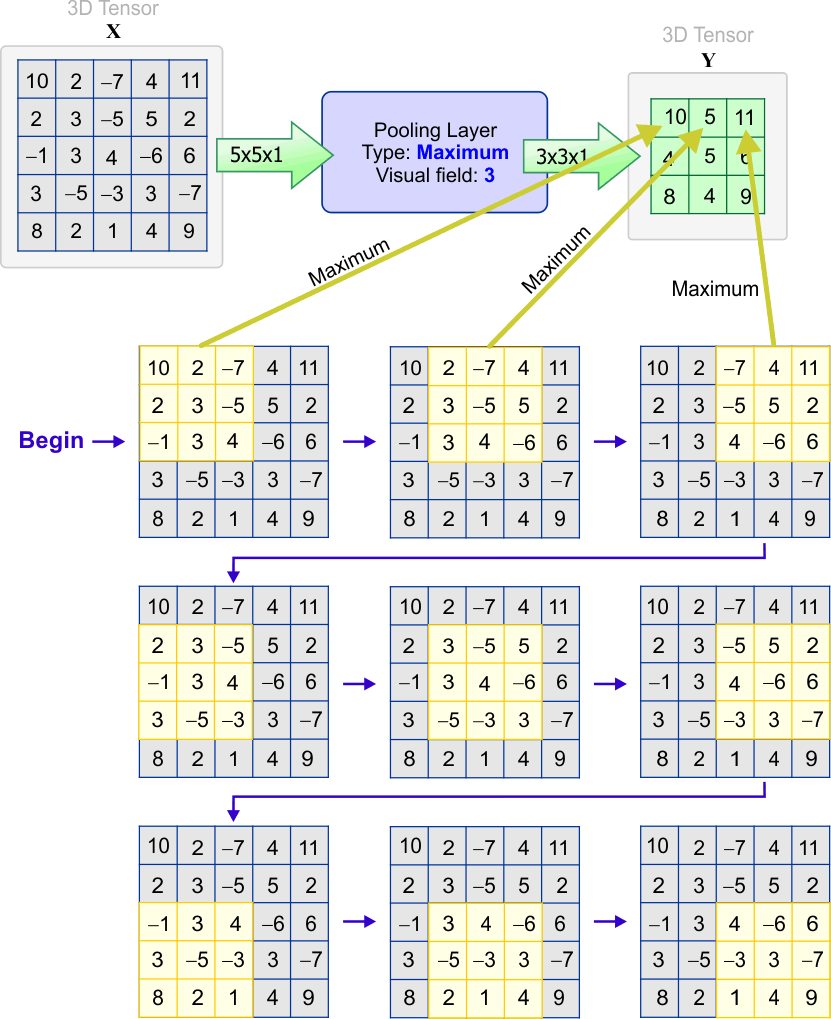
| The figure below shows a pooling layer that uses the maximum value in the window to produce the output. The algorithm begins by placing a moving window at the leftmost and topmost position as shown in the figure. In the figure, the moving window is displayed in yellow. We find the biggest element in the window; in this case 10. This is the first element of the output tensor. The process continues until all values in the output tensor have been computed. In this case, the width and the height of the tensor were reduced from five to three. La figura de abajo muestra una capa de poleo que usa el valor máximo en la ventana para producir la salida. El algoritmo comienza colocando una ventana en la orilla de la izquierda y en la parte superior del tensor como se muestra en la figura. En la figura, la ventana que se mueve se muestra en amarillo. Nosotros encontramos el elemento más grande en la ventana; en este caso un 10. Este es el primer elemento del tensor de salida. El proceso continua hasta que todos los valores del tensor de salida han sido calculados. En este caso, el ancho y el alto del tensor se redujeron de cinco a tres. |
Average Pooling Layer |
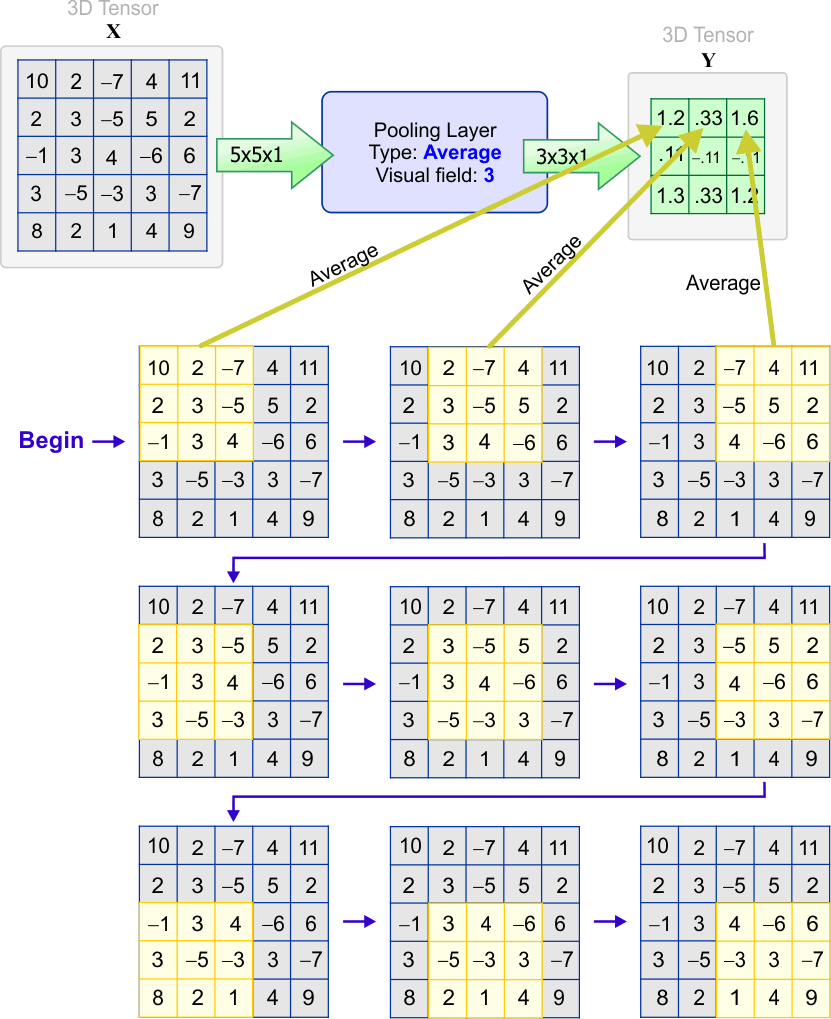
| The figure below shows a pooling layer that used the average of the values in the moving window to produce the output. The moving window is shifted cell by cell, the only difference is that the average value is used instead of the maximum value. La figura de abajo muestra una capa de poleo que usa el valor promedio de los valor en la ventana para producir la salida. La ventana se desplaza casilla por casilla, la única diferencia es que el valor promedio es usado en lugar del valor máximo. |
Receptive Field or Visual Field |
| The visual field indicates the number of outputs horizontally (or vertically) in the previous layer that are used to compute the activation of the current layer as shown in the previous figures. In both of the previous examples, the visual field is three because the values in three columns and three rows are used compute the activation of the current layer. Observe that when the receptive size increases, the number of operations also increases and, consequently training may be come more difficult. El campo visual indica el número de salidas a lo largo (o a lo alto) en el nivel anterior que son usadas para calcular la activación del nivel actual cómo se muestra en las figuras previas. En los dos ejemplos previos, el campo visual es tres porque los valores en tres columnas y en tres renglones son usados para calcular la activación del nivel actual. Observe que cuando el tamaño del campo receptivo se incrementa, el número de operaciones también se incrementa y, consecuentemente el entrenamiento puede ser más difícil. |
| Problem 1 |
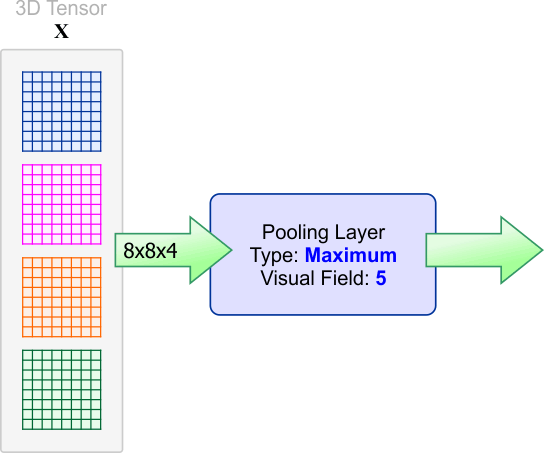
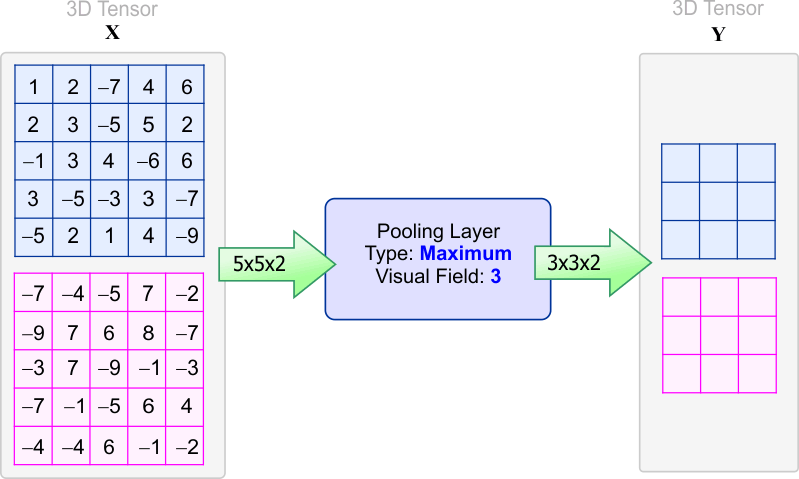
The pooling layer in the figure has a visual field (receptive field) of five. Compute
La capa de poleo en la figura tiene un campo visual (campo receptivo) de cinco. Calcule
|
| Problem 2 |
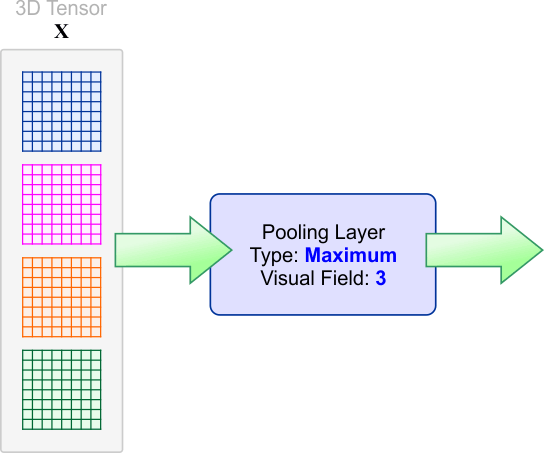
The pooling layer in the figure has a visual field (receptive field) of three. Compute
La capa de poleo en la figura tiene un campo visual (campo receptivo) de tres. Calcule
|
| Problem 3 |
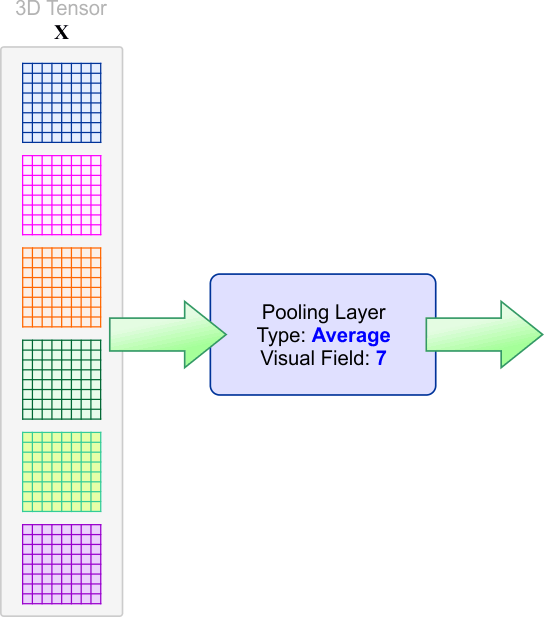
The pooling layer in the figure has a visual field (receptive field) of seven. Compute
La capa de poleo en la figura tiene un campo visual (campo receptivo) de siete. Calcule
|
| Problem 4 |
Create a program in your favorite programming language to compute the output of a pooling layer. You will be able to test your program in the next problems.
|
| Problem 5 |
| Use the program you created in the previous problem to compute the output of the pooling layer shown. Assume that the layer uses the maximum value to compute its output. Assume also that the visual field (receptive field) of the layer is three. Use el programa que usted creó en el problema previo para calcular la salida de la capa de pooling mostrada. Asuma que la capa usa el valor máximo para calcular la salida. Asuma que el campo visual (campo receptivo) de la capa es tres. |
| Problem 6 |
| Use the program you created in the previous problem to compute the output of the pooling layer shown. Assume that the layer uses the average value to compute its output. Assume also that the visual field (receptive field) of the layer is three. Use el programa que usted creó en el problema previo para calcular la salida de la capa de pooling mostrada. Asuma que la capa usa el valor promedio para calcular la salida. Asuma que el campo visual (campo receptivo) de la capa es tres. |

| Problem 7 |
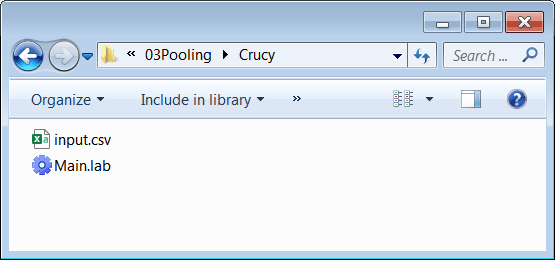
| Create a Neural Lab project Crucy with a Main file to verify the answers of the two previous problems. Cree un proyecto de Neural Lab llamado Crucy con un archivo Main para verificar las respuestas de los dos problemas anteriores. |
| Step A |
| Use notepad or Microsoft Excel to create the file input.csv. Store the file inside the Crucy folder, be sure you to save the file as input.csv and not as input.csv.txt. Use el block de notas o Microsoft Excel para crear el archivo input.csv. Guarde el archivo dentro de la carpeta Crucy, asegúrese de guardar el archivo como input.csv y no como input.csv.txt. |

| Step B |
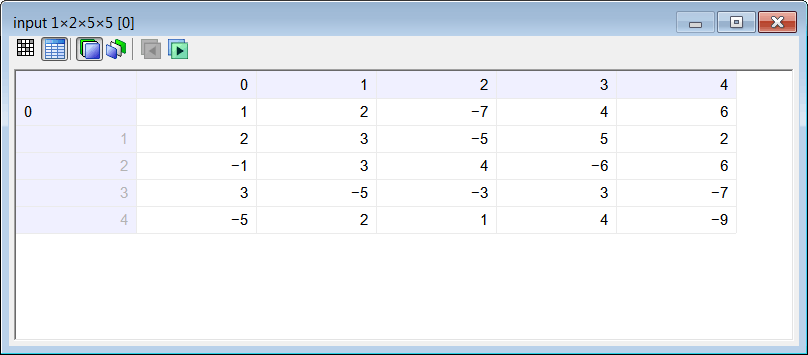
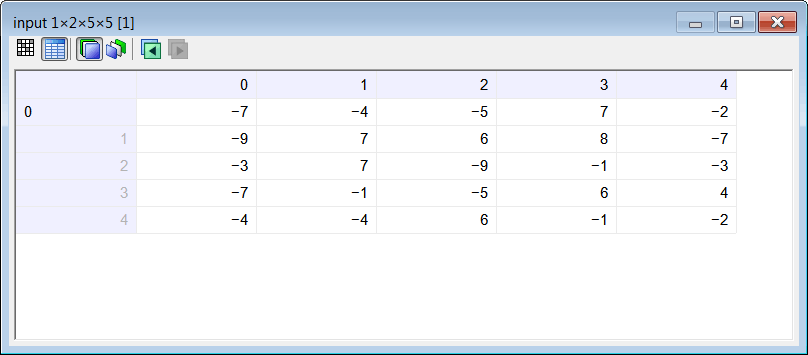
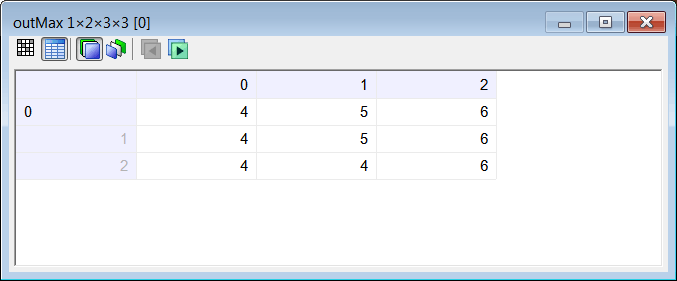
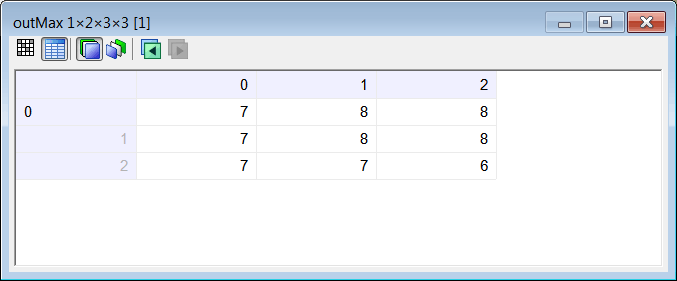
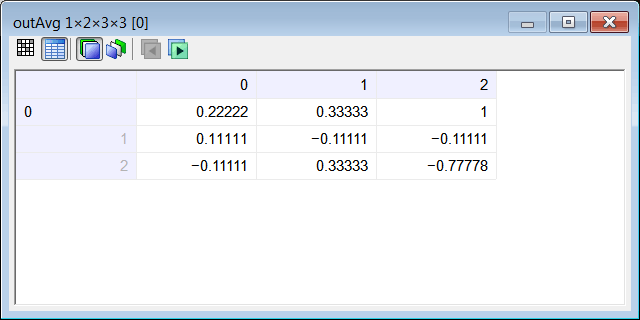
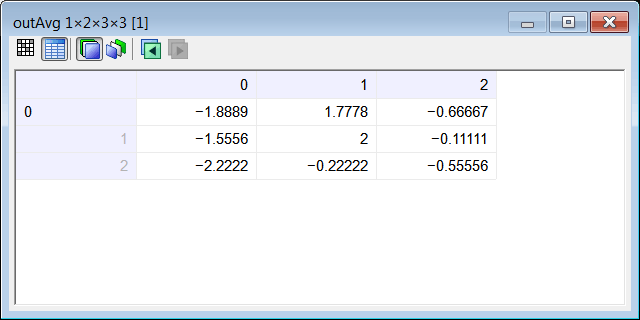
| Edit the Main.lab file. Run the program and double click the input tensor to review the data. Click on "Data View" to verify the values of the first slide, then click on "Next" to verify the values of the second slide. Edite el archivo Main.lab. Ejecute el programa y haga clic doble en el tensor input para revisar los datos. Haga click en "Data View" para verificar los valores de la primera rebanada, entonces haga clic en "Next" para verificar los valores de la segunda rebanada. |
| Crucy\Main.lab |
| //____________________________________ 1. Load Input Tensor input; int depth = 2; int height = 5; int width = 5; input.LoadCsv(depth, height, width); //____________________________________ 2. Create network int visualField = 3; int stride = 1; ConvNet net; net.Create(5, 5, 2, 1); net.SetInRange(1.0, 1.0); // No input scaling net.SetOutRange(1.0, 1.0); // No output scaling //____________________________________ 3. Run (maximum) net.SetPoolLayer(0, 5, visualField, stride); // poolType maximum=5; Tensor outMax; net.Run(input, outMax); //____________________________________ 4. Run (average) net.SetPoolLayer(0, 6, visualField, stride); // poolType average=6; Tensor outAvg; net.Run(input, outAvg); |
| Problem 8 |
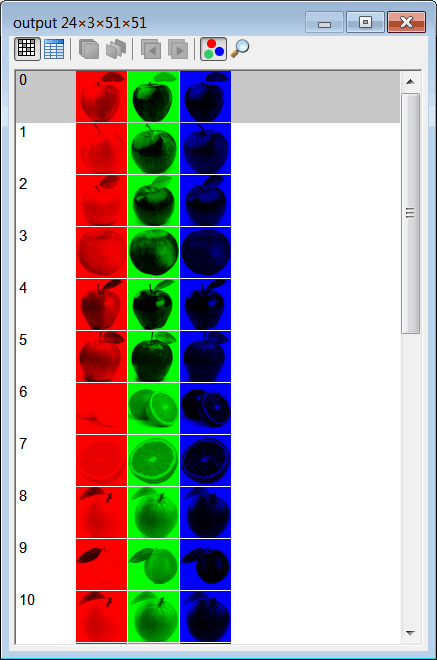
| Open the Grocery project that you created in Convolutional NN > Tensor . Add a new file called FruitPool to test pooling. Abra el proyecto de Grocery que usted creo en Convolutional NN > Tensor . Agregue un archivo nuevo llamado FruitPool para probar pooling. |
| Grocery\FruitPool.lab |
| //______________________________ 1. Load the tensor Tensor fruit; fruit.LoadFolder(); //______________________________ 2. Create the network int visualField = 5; int stride = 5; ConvNet net; net.Create(256, 256, 3, 1); net.SetInRange(0.0, 255.0); net.SetPoolLayer(0, 6, visualField, stride); // poolType: average=6 //______________________________ 3. Run Tensor output; net.Run(fruit, output); |